Guides/Hamlet Survival Guide
| This article may contain instructional language and subjective recommendations. Readers should read the content carefully, and follow accordingly. |
| This guide is full of spoilers! (duh) |
With its unique mechanics, seasonal challenges, and abundance of mobs Don't Starve: Hamlet is considered a challenging yet throughly enjoyable DLC. While many useful guides and tutorials can be found online, I resorted to assembling my own here in an effort to give back to a community that has helped me a lot while navigating the game. It is a work in progress and I thank you for your patience. Bear in mind that this article is a guide and therefore written from a subjective point of view. This guide is meant for everyone new to Don't Starve: Hamlet, whether you've played another Don't Starve game before or not. For more information about how Hamlet, please refer to Don't Starve: Hamlet and the numerous and much useful articles on the Don't Starve Wiki.gg.
Introduction to Don't Starve: Hamlet
The bare basics
In Don't Starve, the world is your oyster - a very dangerous one, that is. In Don't Starve: Hamlet, as well as in the other DLCs and the base game, players are free to explore and interact with the world as they please, with no established route or course of action besides each player's interests and goals. The Constant is a strange dimension where much can be learnt and discovered with little or no instruction from the game as to how, when, or even why to do so, but as you dive in the Don't Starve universe you will start piecing together through experience a very large and fascinating picture.
But let's focus on staying alive first, because in order to progress in this universe, you'll obviously have to - and in Don't Starve, death is final, unless you find the means to unnaturally resurrect yourself. There are three aspects of yourself you'll have to mind in order to survive, and you can keep watch of them in your top right screen: Hunger, Health, and Sanity. You will suffer damage to all three of them as you roam the world of Hamlet and encounter its numerous perils. The first, and most obvious of all, is the threat of starvation; since your spawn in the game your Hunger will progressively drain until, yes, you starve, which will cause your Health to drop to death. Your Health will also be affected by taking damage from aggresive creatures and harmful items in a wide arrange of ways you'll have to learn to counteract and prevent. Similarly to your health, your Sanity will also be affected in a variety of ways until you slowly become insane. While this does not directly drain your health, the monsters that'll appear once you go insane will, as does your next most obvious concern in this game: darkness. Being in the dark is very dangerous in Don't Starve, folks, as it not only drains your Sanity, but the terrible creatures that inhabit it will make a target of your character once your screen goes black.
As you progress in the game, you will learn to effectively and efficiently manage these three stats of your character so they become less of a concern and you become able to focus on exploration; for the world of Don't Starve: Hamlet is a dangerous one, but it is also full of useful resources that will allow you to survive and thrive. This leads us to the very important mechanic of crafting. Your left screen tab of crafting will allow you to build numerous tools and structures to help you move forward, so collecting the necessary resources and learning the recipes needed to prototype these items will also be a priority of yours when playing Don't Starve: Hamlet. So, basically, you will be exploring, collecting, crafting and, eventually, fighting your way through this game!
The world of Hamlet
Exotic, tropical and dangerous, the world of Hamlet is one full of jungles, ancient civilizations and treasures.
Getting started in Don't Starve: Hamlet
–Wilson, examining a Monogrammed Luggage A.
–Willow, examining a Monogrammed Luggage A.
–Wolfgang, examining a Monogrammed Luggage A.
–Wendy, examining a Monogrammed Luggage A.
–WX-78, examining a Monogrammed Luggage A.
–Wickerbottom, examining a Monogrammed Luggage A.
–Woodie, examining a Monogrammed Luggage A.
–Maxwell, examining a Monogrammed Luggage A.
–Wagstaff, examining a Monogrammed Luggage A.
–Wigfrid, examining a Monogrammed Luggage A.
–Webber, examining a Monogrammed Luggage A.
–Walani, examining a Monogrammed Luggage A.
–Warly, examining a Monogrammed Luggage A.
–Woodlegs, examining a Monogrammed Luggage A.
–Wilba, examining a Monogrammed Luggage A.
–Wormwood, examining a Monogrammed Luggage A.
–Wheeler, examining a Monogrammed Luggage A.
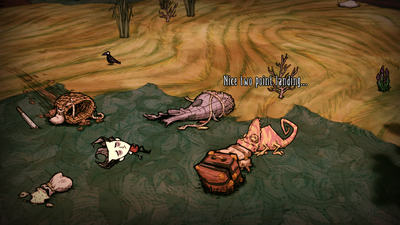
Day one: A nice two-point landing
DO: pick up the machete, gather your essentials (twigs, grass, flint, logs, food) and make it through the night.
DON'T: get into a fight.
Welcome to your brand-new, unique Hamlet world. Each world map is randomly generated, but you will always spawn first hour of the day in the Rainforest biome, in the first day of temperate season, and surrounded by the remains of what seems to be a crashed air balloon. A machete will be lying nearby. Pick it up. You'll need it.
You have now landed in a perilous tropical wild world full of hostile mobs and wonderful treasures.
Take a stroll around to get acquainted with the spot you've landed in and find out what's nearby and, as you do, make sure you pick saplings for twigs, hack tall grass for cut grass with your machete, and flip stone slabs, under which all kinds of useful resources can be found. Make sure you also pick up any food you come across, such as asparagus or radishes. In the early game, Hunger will be one of your main concerns. Darkness, come nightime, will be another, for it is deadly without a light source. Twigs and grass can be used to craft a basic torch, but if you find flint, you'll be able to craft an axe which will allow you to chop down trees for logs to create a campfire, which will also allow you to cook any food you've gathered. There should be some rainforest trees near your spawning point; be careful when chopping them down, though, for they may drop food items such as eggs when chopped down, but also vipers or even scorpions you'll need to fight or avoid.
If you craft a hammer, you can destroy the remains of your crash for more useful items and tools, but if you don't, you can always come back later, for its location will show up on your map.
Remember, upon spawning you are very vulnerable and any aggressive mobs will take you down due to your lack of armor and decent weapons. Gather your essentials, explore your surroundings and make it through the night.
–Wilson, examining a pig farmer
–Willow, examining a pig farmer
–Wolfgang, examining a pig farmer
–Wendy, examining a pig farmer
–WX-78, examining a pig farmer
–Wickerbottom, examining a pig farmer
–Woodie, examining a pig farmer
–Maxwell, examining a pig farmer
–Wagstaff, examining a pig farmer
–Wigfrid, examining a pig farmer
–Webber, examining a pig farmer
–Walani, examining a pig farmer
–Warly, examining a pig farmer
–Woodlegs, examining a pig farmer
–Wilba, examining a pig farmer
–Wormwood, examining a pig farmer
–Wheeler, examining a pig farmer
Day two: Pig City basics
DO: locate Swinesbury and get acquainted with its grounds, locate the Slanty Shanty.
DON'T: steal from the pig farms.
Wherever you spawn on day one, the Cultivated biome, which surrounds the Pig City, will be nearby. This is one of the safest places in Hamlet's world, the home of a most peculiar civilization built by Pigs. In Don't Starve: Hamlet all pigs are friendly by default and, except for guards, harmless. Since resources within city limits are scarce or can only be obtained by trading, make sure you have everything you need to face hunger and darkness before going downtown.
The farmlands
When walking the cultivated grounds on your way to Pig City, you will come across Watch Towers and Pig Guards, meant to protect other pigs from aggressive mobs; vegetable farms, berry farms, grass farms, twig farms and flower farms, where Pig Farmers work, and boulders, where Pig Miners work. To summarize, a lot of otherwise scarce useful resources, all at hand's reach... Well no, not really, since if you take anything from the farms it will be considered stealing and you will be chased by the pig guard assigned to that specific farm. Unless wearing a Swashy Hat, harvesting pig farms is therefore not advised. Armed with a halberd, pig guards are not to be underestimated, and they will remember you, coming after you again the next time you walk by their post. Pig guards will attack you if you do anything inappropriate within cultivated or city grounds, such as stealing, attacking a pig, or destroying a structure. Taking the loot dropped by a pig killed by a mob from the ground will also be considered stealing, so beware, especially within city grounds, where guards are difficult to avoid. Pig guards will also put out any fires built by the player, so take this into account when walking these biomes at night.
In addition to farms, tea trees can be found in the cultivated biome. These are a good source for logs, twigs and seed pods, and are often inhabited by pikus, squirrel-like creatures who love to steal dropped items and provide one morsel meat when killed. Since seed pods are also edible, chopping down tea trees is a good emergency way of obtaining food, especially if one places traps near the trees, using seeds as bait.
The suburbs
Also surrounding the Pig City you will find the suburbs, a biome of variable size covered in mossy turf. Take your time to explore every inch of this small biome, for you will find an abundance of twigs, grass and rocks here, and also rot.
The city: Swinesbury
This Pig City will most likely be your operations centre throughout the Hamlet game, and that's why we are visiting it on day two. You will find yourself in a beautiful town named Swinesbury, complete with pavement, lamp posts, ornamental gardens, town houses and pig shops. Mapping the entire town out will be extremely useful in your future, so walk every street as you marvel at the variety of town inhabitants you will find, each spawning from a town house. They roam the streets at daytime, when you can interact with them and exchange specific goods for oincs, the local currency. You will use these oincs to purchase goods at the shops, which stay open until nighttime.
Somewhere in town, you will find a locked but uninhabited house called the Slanty Shanty. Congratulations, you're staring at your new home/basecamp. For now, you can pick the grass on the outside and chop down that creepy looking Spiky Tree for twigs.
–Wilson, when examining an Oinc.
–Willow, when examining an Oinc.
–Wolfgang, when examining an Oinc.
–Wendy, when examining an Oinc.
–WX-78, when examining an Oinc.
–Wickerbottom, when examining an Oinc.
–Woodie, when examining an Oinc.
–Maxwell, when examining an Oinc.
–Wagstaff, when examining an Oinc.
–Wigfrid, when examining an Oinc.
–Webber, when examining an Oinc.
–Walani, when examining an Oinc.
–Warly, when examining an Oinc.
–Woodlegs, when examining an Oinc.
–Wilba, when examining an Oinc.
–Wormwood, when examining an Oinc.
–Wheeler, when examining an Oinc.
Day 3: A House and a Home
DO: unlock the Slanty Shanty to set up base inside.
DON'T: forget to take care of your Hunger and other needs in the meantime.
To thrive in Don't Starve: Hamlet we will need to set up a base camp, and the Slanty Shanty in Swinesbury is arguably the best place in the game to do so. To unlock it, you will need to exchange 50 oincs for a Deed of home ownership at the Swinesbury City Hall. Inside it, you will be safe from attackers, weather inclemencies, and since it's equipped with a hanging lightbulb, darkness. As the game progresses you will need to build certain structures for crafting, food and survival, and if you build them inside the shanty, they will be safe, too. Only fire can harm this house, fire sparked, for example, from a lightning strike; but if the Slanty Shanty burns down, pig workers from the city will rebuild it and every structure inside it. Lightning will never strike the shanty while you are inside it.
This will also be the right place for you to store your items for future purposes. Seasons change and you will have different needs in different times and places of the game. So how do we get the 50 oincs we need to unlock the Slanty Shanty?
Trading of goods and oincs
As we mentioned before, in addition to town houses, one can find shops and other special buildings in Swinesbury, open during daytime and dusk.
The Sterling Trough Deli
Cooked meals.Pigg and Pigglet's General Store
Tools, Survival items and Crafting materials.Curly Tails Mud Spa
Healing items.Swinesbury Fine Grocer's
Raw Food items.Swinesbury City Hall
Housing and Security Contracts.Swinesbury Academy
A place to sell Lost Relics
In the early game, as you learn to properly manage your resources, remembering that food is sold in the city can be useful, as are the tools and survival items such as the backpack you can purchase at the general store. Actually, you might be running out of inventory space already. A backpack may already be for sale at Pigg and Pigglet's General Store for 5 oincs. Pig shops restock constantly and change the items available for buying often, so if they don't have what you need right now, visit again in a couple of days. But before going shopping, you will need money, right?
You may have noticed that not every future neighbour of yours look the same. In Swinesbury there live different pigs with different needs. (See the article on Pig Traders for more information about the different pigs.) As you walk through town, they will tell you what they're after... In a more or less cryptic way. Since some of them ask for items that are very easy to obtain safely, such as flower petals, trading these items with them for oincs is the easiest way to put together the 50 oincs you need for the Deed of home ownership:
| Pig Trader | Looks like this | What they want | What you'll get | Limit | Do this |
|---|---|---|---|---|---|
| Beautician | 2x | Once per day |
| ||
| Florist | 1x | Once per day |
| ||
| Shopkeep | 1x | No |
| ||
| Farmer | 1x | Once per day |
| ||
| Miner | 1x | Once per day |
| ||
| Usher | 4x | Once per day |
|
Mind that some of these pigs can also be found inside buildings as shopkeepers and you can trade with them, too, so come dusk time, you can visit each shop to gather those additional oincs, since everybody has gone home but shops remain open 'til night. This is also a good time to check you have everything you need to make it through nightime. Do not forget that you still need to eat, to keep safe from aggresive mobs and a source of light to make it through nightime as you gather the 50 oincs to enter the safety of the Slanty Shanty. It shouldn't take you more than a couple days to put the money together.
A good strategy is to spend a day traveling to nearby biomes to gather twigs, grass, stones and flower petals; as you do so, also gather logs, flint and food such as asparagus, radishes, aloe and seeds for your own survival. Hunting Peagawks for feathers will also keep you well fed, and if you walk the edges of a Deep Rainforest biome you may even spot a lost relic you can pick up safely without really entering the jungle and trade later for ten oincs at the Swinesbury Academy. Once you've gathered enough items, initiate your return to Swinesbury. Come nightime, camp near the city but outside the biome so pig guards don't put out your fire. Choose a safe spot, cook your gathered food in a campfire and head downtown in the morning to trade with the pigs on the streets. As you walk the streets, shave any grown hedges you come across for clippings to trade, and pick up any manure you find laying around. Each time you pick manure from the ground in town and you are seen by a neighbour, you will be given 1 oinc, so don't pick up seeds from the town's grounds - pigs eat them and then produce manure - and don't pick manure in town at dusk or night time, for you will not be seen and therefore not rewarded. Don't worry, it will still be there in the morning for you to pick up. Keep in mind that if you drop any edible items on the town's grounds, the pigs will eat them, too.
Last but not least, beware of the Masked Pig. These sneak up on you and steal your oincs, making all your progress in saving for the Deed of home ownership lost!–Wilson, examining the unlocked Slanty Shanty
–Willow, examining the unlocked Slanty Shanty
–Wolfgang, examining the unlocked Slanty Shanty
–Wendy, examining the unlocked Slanty Shanty
–WX-78, examining the unlocked Slanty Shanty
–Wickerbottom, examining the unlocked Slanty Shanty
–Woodie, examining the unlocked Slanty Shanty
–Maxwell, examining the unlocked Slanty Shanty
–Wagstaff, examining the unlocked Slanty Shanty
–Wigfrid, examining the unlocked Slanty Shanty
–Webber, examining the unlocked Slanty Shanty
–Walani, examining the unlocked Slanty Shanty
–Warly, examining the unlocked Slanty Shanty
–Woodlegs, examining the unlocked Slanty Shanty
–Wilba, examining the unlocked Slanty Shanty
–Wormwood, examining the unlocked Slanty Shanty
–Wheeler, examining the unlocked Slanty Shanty
Day 5: Base Basics
(work in progress)

