World Customization/Don't Starve Together
 |
|
|
|
 |
Exclusive to: ![]()
In Don't Starve Together, all customization options from the base game and the Reign of Giants DLC as well as several additional options are available.
World Settings for Forest
Global
| Type | Icon | Content |
|---|---|---|
| Events | Determines the presence/absence of official seasonal events. Available options are none, auto. | |
| Autumn | Determines the length of the Autumn season. Available options are none, very short, short, default, long, very long and random. | |
| Winter | Determines the length of the Winter season. Available options are none, very short, short, default, long, very long and random. | |
| Spring | Determines the length of the Spring season. Available options are none, very short, short, default, long, very long and random. | |
| Summer | Determines the length of the Summer season. Available options are none, very short, short, default, long, very long and random. | |
| Day Type | Determines the length and/or presence/absence of Day, Dusk, and Night. Available options are default, long Day, long Dusk, long Night, no Day, no Dusk, no Night, only Day, only Dusk and only Night. | |
| Spawn Mode | Determines the spawn point of players. Available options are Florid Postern and Random. | |
| Survivor Death | Determines what happens, when a player dies. Available options are Become a Ghost and Change Survivor. | |
| Revive At Florid Postern | Determines if players can revive at the Florid Postern. Available options are Disabled and Enabled. | |
| Ghost Sanity Drain | Determines if a ghost player drains the sanity of other players. Available options are Disabled and Enabled. | |
| Death Reset Timer | Determines the length of the timer when all players are dead. Available options are Disabled, Slow, Default, Fast and Instant. | |
| Beefalo Mating Frequency | Determines the frequency and length at which Beefalo will go into heat. Available options are none, little, default, more and tons. | |
| Krampii | Determines the threshold of naughtiness to spawn and the amount of Krampus spawned. Available options are none, little, default, more and tons. |
Events
Available options are default, always.
| Type | Icon | Content |
|---|---|---|
| Midsummer Cawnival | Determines the presence/absence of Midsummer Cawnival. | |
| Hallowed Nights | Determines the presence/absence of Hallowed Nights. | |
| Winter's Feast | Determines the presence/absence of Winter's Feast. | |
| Year of the Gobbler | Determines the presence/absence of Year of the Gobbler. | |
| Year of the Varg | Determines the presence/absence of Year of the Varg. | |
| Year of the Pig King | Determines the presence/absence of Year of the Pig King. | |
| Year of the Carrat | Determines the presence/absence of Year of the Carrat. | |
| Year of the Beefalo | Determines the presence/absence of Year of the Beefalo. | |
| Year of the Catcoon | Determines the presence/absence of Year of the Catcoon. | |
| Year of the Bunnyman | Determines the presence/absence of Year of the Bunnyman. |
Survivors
| Type | Icon | Content |
|---|---|---|
| Extra Starting Resource | Determines when new players joining the world start to receive extra starting resources. Available options are always, after day 5, after day 10 (default), after day 15, after day 20 and never. | |
| Seasonal Starting Items | Determines whether new players joining the world will receive a seasonal cloth item or not. Available options are none and default. | |
| Griefer Spawn Protection | Determines whether a player that newly spawns in will receive system protection that allows them to walk through structures and prevents them from being targeted. Available options are none, auto detect and always. | |
| Drop Items on Disconnect | Determines whether a player will drop only irreplaceable items or drop all their items when they leave the server. Available options are default and everything. | |
| Max Health Penalty | Determines if players receive a max health penalty if they get revived by a Telltale Heart or at the Florid Postern. Available options are Enabled and Disabled. | |
| Damage Taken | Determines the damage a player is taking. Available options are Default, Less and More. | |
| Temperature Damage | Determines if players die from temperature damage. Available options are Default and Nonlethal. | |
| Darkness Damage | Determines if players die from darkness damage. Available options are Default and Nonlethal. | |
| Enlightenment Monsters | Determines the spawn rate and maximum amount of Gestalts. Available options are none, little, default, more and tons. | |
| Sanity Monsters | Determines the spawn rate and maximum amount of Shadow Creatures. Available options are none, little, default, more and tons. |
World
Available options are none, little, default, more and tons.
| Type | Icon | Content |
|---|---|---|
| Hound Attacks | Determines the frequency of Hound Attacks and maximum amount of Hounds. | |
| Ice Hound Waves | Determines whether the Ice Hounds can spawn or not. Available options are none and default. | |
| Fire Hound Waves | Determines whether the Fire Hounds can spawn or not. Available options are none and default. | |
| Forest Petrification | Determines how fast Evergreens will turn into Petrified Trees. Available options are none, slow, default, fast and very fast. | |
| Frog Rain | Determines the frequency of Frog Rain and maximum amount of falling Frogs. | |
| Hunt Surprises | Determines the frequency at which Varg and Ewecus will be encountered while hunting. | |
| Hunts | Determines the amount of naturally spawning animal tracks. | |
| Lightning | Determines the frequency of lightning strikes. | |
| Meteor Frequency | Determines the frequency of Meteor Shower. | |
| Rain | Determines the frequency of Rain. | |
| Wild Rift Frequency | Determines the frequency of Lunar Rifts appearing. | |
| Wild Rifts Enabled | Determines if Lunar Rifts appear. Available options are Default, None and Always. | |
| Wildfires | Determines the rate at which objects start smoldering in Summer. |
Resource Regrowth
Available options are none, very slow, slow, default, fast and very fast.
| Type | Icon | Content |
|---|---|---|
| Regrowth Multiplier | Determines the overall world regrowth speed multiplier. | |
| Basic Resources | Determines if the world regrows basic resources like Grass Tufts, Saplings, Berry Bushes and Flint. Available options are Disabled and Enabled. | |
| Birchnut Trees | Determines how fast the world regrows a new Birchnut Tree. | |
| Cacti | Determines how fast the world regrows a new Cactus. | |
| Carrots | Determines how fast the world regrows a new Carrot. | |
| Evergreens | Determines how fast the world regrows a new Evergreen. | |
| Flowers | Determines how fast the world regrows a new Flower. | |
| Lune Trees | Determines how fast the world regrows a new Lune Tree. | |
| Palmcone Trees | Determines how fast the world regrows a new Palmcone Tree. | |
| Reeds | Determines how fast the world regrows a new Reed. | |
| Salt Formations | Determines how fast Salt Formations grow back a stage. | |
| Twiggy Trees | Determines how fast the world regrows a new Twiggy Tree, and the frequency of dropping Twigs. |
Unnatural Portal Resources
Available options are none, little, default, more and tons.
| Type | Icon | Content |
|---|---|---|
| Banana Bushes | Determines the chance of Banana Bushes being picked to spawn from Unnatural Portal. | |
| Crustashines | Determines the chance of Crustashines being picked to spawn from Unnatural Portal. | |
| Monkeytails | Determines the chance of Monkeytails being picked to spawn from Unnatural Portal. | |
| Palmcone Sprouts | Determines the chance of Palmcone Sprouts being picked to spawn from Unnatural Portal. | |
| Portal Activity | Determines the frequency of Unnatural Portal to spawn things. | |
| Powder Monkeys | Determines the chance of Powder Monkeys being picked to spawn from Unnatural Portal. |
Creatures
Available options are none, little, default, more and tons.
| Type | Icon | Content |
|---|---|---|
| Bees | Determines the maximum amount and respawn time of Bees in Bee Boxs and Beehives. | |
| Birds | Determines the maximum amount of Birds that land near the players at the same time. | |
| Bunnymen | Determines the respawn time of Bunnymen from Rabbit Hutch. | |
| Butterflies | Determines the maximum amount of Butterflies that naturally spawn from Flowers at the same time. | |
| Catcoons | Determines the respawn time of Catcoons from Hollow Stumps. | |
| Gnarwails | Determines the spawn chance of Gnarwails. | |
| Gobblers | Determines the spawn chance of Gobblers. | |
| Grass Gekko Morphing | Determines the morph chance of Grass Gekkos at Surface. | |
| Moles | Determines the respawn time of Moleworms from Burrows at Surface. | |
| Pengulls | Determines the maximum amount of Pengulls and their colony, their spawning interval and the amount of Mini Glaciers around their colony. | |
| Pigs | Determines the respawn time of Pigs from Pig Houses. | |
| Rabbits | Determines the respawn time of Rabbits from Rabbit Holes. | |
| Schools of Fish | Determines the spawn chance of Schools of Fish. | |
| Wobsters | Determines the respawn time and maximum amount of Wobsters from Wobster Mounds. |
Hostile Creatures
Available options are none, little, default, more and tons.
| Type | Icon | Content |
|---|---|---|
| Bats | Determines the respawn time and maximum amount of Batilisks at Cave Entrance. | |
| Cookie Cutters | Determines the respawn time and maximum amount of Cookie Cutters. | |
| Frogs | Determines the respawn time and maximum amount of Frogs in Ponds. | |
| Horror Hounds | Determines whether Horror Hounds can spawn or not. Available options are none and default. | |
| Hounds | Determines the respawn time and maximum amount of Hounds in Hound Mounds. | |
| Killer Bees | Determines the respawn time and maximum amount of Killer Bees in Killer Bee Hives. | |
| Lureplants | Determines the spawn frequency of Lureplants. | |
| MacTusks | Determines the respawn time of MacTusks from Walrus Camps. | |
| Merms | Determines the respawn time and maximum amount of Merms in Leaky Shacks and Wurt's Merm House. | |
| Moon Quay Pirates | Determines the spawn frequency of Pirate Raid. | |
| Moonrock Pengulls | Determines whether Moonrock Pengulls can spawn or not. Available options are none and default. | |
| Mosquitos | Determines the respawn time and maximum amount of Mosquitos in Ponds. | |
| Sharks | Determines the spawn chance of Rockjaws. | |
| Shatter Spiders | Determines mainly the respawn time and maximum amount Shattered Spiders. | |
| Skittersquids | Determines the spawn chance and spawn amount of Skittersquids. | |
| Spider Warriors | Determines whether Spider Warriors can spawn or not. Available options are none and default. | |
| Spiders | Determines the respawn time and maximum amount of Spiders from Spider Den, also determines the amount of Spider Warriors that will spawn when Spider Den being attacked. |
Giants
Available options are none, little, default, more and tons.
| Type | Icon | Content |
|---|---|---|
| Antlion Tribute | Determines the rate at which the Antlion becomes angered. | |
| Bearger | Determines mainly the spawning day of Bearger in Autumn. | |
| Bee Queen | Determines the respawn time of Bee Queen, and the chance of spawing when players hit Gigantic Beehive. | |
| Crabking | Determines the respawn time of Crab King. | |
| Deerclops | Determines the respawn time of Deerclops, and attack times per season. | |
| Dragonfly | Determines the respawn time of Dragonfly. | |
| Eye of Terror | Determines the respawn time of Eye of Terror and Twins of Terror. | |
| Klaus | Determines the spawn delay time of Loot Stash, and how many times it can resapwn per Winter. | |
| Lord of the Fruit Flies | Determines the earliest possible spawn time and the respawn time of Lord of the Fruit Flies, and the amount of Farm Plants needed to spawn it. | |
| Malbatross | Determines the spawn chance of Malbatross. | |
| Meese/Geese | Determines the amount of nest that will spawn Geese. | |
| Poison Birchnut Trees | Determines the rate at which Birchnut Trees become angered. | |
| Spider Queen | Determines the spawn rate of Spider Queen. | |
| Treeguards | Determines the spawn rate of Treeguards. |
World Generation for Forest
Global
| Type | Icon | Content |
|---|---|---|
| Starting Season | Determines the starting season. Available options are Autumn, Winter, Spring, Summer, Autumn or Spring, Winter or Summer and random. |
World
| Type | Icon | Content |
|---|---|---|
| Biomes | Determines whether Reign of Giants biomes will be generated in the world. Available options are classic and together (default). | |
| Spawn Area | Available options are default, plus and dark. The plus option places 3 chests around the postern with sufficient supplies to skip the first gathering phase of the game. The dark option places a single chest and campfire around the postern with fewer supplies to make an always-night game possible. | |
| World Size | Determines the size of the world. This does not appear to increase the number of biomes. It just makes the individual biomes larger. Available options are small, medium, large (default), and huge. | |
| Branches | Determines the degree to which the land will branch off and be connected by bridging pieces. Available options are never, least, default, most and random. Never creates circle maps with large holes in the middle. Most creates maps with a center and multiple arms. See the picture below this table for examples of how this option changes the shape of the map in combination with Land Looping. | |
| Loops | Determines the degree to which Roads will tend to lead you in circles, in addition to determining the degree to which the land will curve. Available options are none, default and always. See the picture below this table for examples of how this option changes the shape of the map in combination with Land Branching. | |
| Roads | Determines whether natural Roads can spawn or not. Available options are none and default. | |
| Touch Stones | Determines the amount of naturally spawning Touch Stones. Available options are none, little, less, default, more, lots, tons and insane. | |
| Failed Survivors | Determines the amount of naturally spawning Set Pieces. Available options are none, little, less, default, more, lots, tons and insane. | |
| Starting Resource Variety | Determines how many basic resources () will be replaced by their alternate versions. Available options are classic, default and highly random, classic means no alternate versions and highly random means a lot alternate versions. | |
| Celestial Fissures | Determines the amount of naturally spawning Celestial Fissures. Available options are none, little, less, default, more, lots, tons and insane. | |
| Stage Plays | x Available options are Default and None. | |
| Terrarium | Determines whether Conspicuous Chest and Terrarium can spawn or not. Available options are none and default. |
Resources
Available options are none, little, less, default, more, lots, tons and insane.
| Type | Icon | Content |
|---|---|---|
| Anenemies | Determines the amount of naturally spawning Anenemies. | |
| Beached Bull Kelp | Determines the amount of naturally spawning Beached Bull Kelps. | |
| Berry Bushes | Determines the amount of naturally spawning Berry Bushes. | |
| Boulders | Determines the amount of naturally spawning Boulders. | |
| Bull Kelp | Determines the amount of naturally spawning Bull Kelps. | |
| Cacti | Determines the amount of naturally spawning Cacti. | |
| Carrots | Determines the amount of naturally spawning Carrots. | |
| Flint | Determines the amount of naturally spawning Flint found on the ground. | |
| Flowers, Evil Flowers | Determines the amount of naturally spawning Flowers and Evil Flowers found on the ground. | |
| Grass | Determines the amount of naturally spawning Grass Tufts. | |
| Hot Springs | Determines the amount of naturally spawning Hot Springs. | |
| Lunar Rocks | Determines the amount of naturally spawning Moon Glasses. | |
| Lunar Saplings | Determines the amount of naturally spawning Lunar Saplings. | |
| Lune Trees | Determines the amount of naturally spawning Lune Trees. | |
| Meteor Fields | Currently seems to have no effect. | |
| Mini Glaciers | Determines the amount of naturally spawning Mini Glaciers. | |
| Mushrooms | Determines the amount of naturally spawning Mushrooms. | |
| Ponds | Determines the amount of naturally spawning Ponds. | |
| Palmcone Trees | Determines the amount of naturally spawning Palmcone Trees. | |
| Reeds | Determines the amount of naturally spawning Reeds. | |
| Saplings | Determines the amount of naturally spawning Saplings. | |
| Sea Stacks | Determines the amount of naturally spawning Sea Stacks. | |
| Spiky Bushes | Determines the amount of naturally spawning Spiky Bushes. | |
| Stone Fruit Bushes | Determines the amount of naturally spawning Stone Fruit Bushes. | |
| Trees (All) | Determines the amount of naturally spawning Trees. | |
| Tumbleweeds | Determines the amount of naturally spawning Tumbleweeds. |
Creatures and Spawners
Available options are none, little, less, default, more, lots, tons and insane.
| Type | Icon | Content |
|---|---|---|
| Bee hives | Determines the amount of naturally spawning Beehives. | |
| Beefalos | Determines the population of naturally spawning Beefalo. | |
| Buzzards | Determines the amount of naturally spawning Buzzards. | |
| Carrats | Determines the amount of naturally spawning Carrats. | |
| Hollow Stump | Determines the amount of naturally spawning Hollow Stumps. | |
| Mole Burrows | Determines the amount of naturally spawning Moleworm Burrows. | |
| Pig Houses | Determines the amount of naturally spawning Pig Houses. | |
| Rabbit Holes | Determines the amount of naturally spawning Rabbit Holes. | |
| Saladmanders | Determines the amount of naturally spawning Saladmanders. | |
| Shoals | Determines the amount of naturally spawning Deep Bass Shoals. | |
| Volt Goats | Determines the population of naturally spawning Volt Goats. | |
| Wobster Mounds | Determines the amount of naturally spawning Wobster Mounds. |
Hostile Creatures and Spawners
Available options are none, little, less, default, more, lots, tons and insane.
| Type | Icon | Content |
|---|---|---|
| Clockworks | Determines the number of naturally spawning Clockwork Monsters. | |
| Hound Mounds | Determines the amount of naturally spawning Hound Mounds. | |
| Killer Bee Hives | Determines the amount of naturally spawning Killer Bee Hives. | |
| Leaky Shack | Determines the number of naturally spawning Merm Rundown Houses. | |
| MacTusk Camps | Determines the number of naturally spawning Walrus Camps. | |
| Sea Weeds | Determines the amount of naturally spawning Sea Weeds. | |
| Shattered Spider Holes | Determines the number of naturally spawning Shattered Spider Holes. | |
| Spider Dens | Determines the number of naturally spawning Spider Dens. | |
| Tallbirds | Determines the population of Tallbird Nests. | |
| Tentacles | Determines the amount of naturally spawning Tentacles. |
World Settings for Caves
Don't Starve Together also allows to customize the Caves world, since they are managed on a different server shard.
World
| Type | Icon | Content |
|---|---|---|
| Ancient Gateway | Determines the cooldown of Ancient Gateway. Available options are none, very slow, slow, default, fast and very fast. | |
| Cave Worm Attacks | Determines the frequency of Depths Worm attacks and maximum amount of Depths Worms. Available options are none, little, default, more and tons. | |
| Earthquakes | Determines the frequency of earthquakes. Available options are none, little, default, more and tons. | |
| Rain | Determines the frequency of Rain. Available options are none, little, default, more and tons. | |
| Wild Rift Frequency | Determines the frequency of Shadow Rifts appearing. | |
| Wild Rifts Enabled | Determines if Shadow Rifts appear. Available options are Default, None and Always. |
Resource Regrowth
Available options are none, very slow, slow, default, fast and very fast.
| Type | Icon | Content |
|---|---|---|
| Regrowth Multiplier | Determines the overall world regrowth speed multiplier. | |
| Light Flower | Determines how fast the world regrows a new Light Flowers. | |
| Lightbug Flower | Determines how fast the world regrows a new LightFlier Flowers | |
| Lunar Mushtrees | Determines how fast the world regrows a new Lunar Mushtrees. | |
| Mushroom Trees | Determines how fast the world regrows a new Mushtrees. |
Creatures
Available options are none, little, default, more and tons.
| Type | Icon | Content |
|---|---|---|
| Bulbous Lightbugs | Determines the regrowth time of a harvested LightFlier Flowers. | |
| Bunnymen | Determines the respawn time of Bunnymen from Rabbit Hutch. | |
| Dust Moths | Determines the respawn time of Dust Moths from Tidy Hidey-Hole. | |
| Grass Gekko Morphing | Determines the morph chance of Grass Gekkos at Caves. | |
| Moles | Determines the respawn time of Moleworms from Burrows at Caves. | |
| Mush Gnomes | Determines the respawn time of Mush Gnomes. | |
| Pigs | Determines the respawn time of Pigs from Pig Houses. | |
| Rock Lobsters | Determines the maximum amount of Rock Lobsters in an area, this will only have diffenrence when two Rock Lobster herds come very close. | |
| Slurtles | Determines the respawn time and maximum amount of Slurtles in Slurtle Mounds. | |
| Snurtles | Determines the chance of Snurtles spawned from Slurtle Mounds. | |
| Splumonkeys | Determines the respawn time and maximum amount of Splumonkey from Splumonkey Pods. |
Hostile Creatures
Available options are none, little, default, more and tons.
| Type | Icon | Content |
|---|---|---|
| Bats | Determines the respawn time and maximum amount of Batilisks from Bat Cave. | |
| Cave Spiders | Determines the respawn time and maximum amount of Cave Spiders from Spilagmite. | |
| Dangling Depth Dwellers | Determines the respawn time and maximum amount of Dangling Depth Dwellers. | |
| Merms | Determines the respawn time and maximum amount of Merms in Leaky Shacks and Wurt's Merm House.. | |
| Naked Mole Bats | Determines the respawn time of Naked Mole Bats from above sinkhole light, and the cooldown time of their ally summon ability. | |
| Ruins Nightmares | Determines the amount of naturally spawning Shadow Creatures in the Ruins during Nightmare Cycle. | |
| Spider Warriors | Determines whether Spider Warriors can spawn or not. Available options are none and default. | |
| Spiders | Determines the respawn time and maximum amount of Spiders from Spider Den, also determines the amount of Spider Warriors that will spawn when Spider Den being attacked. | |
| Spitter Spiders | Determines the spawn chance of Spitters from Spilagmite. |
Giants
Available options are none, little, default, more and tons.
| Type | Icon | Content |
|---|---|---|
| Lord of the Fruit Flies | Determines the earliest possible spawn time and the respawn time of Lord of the Fruit Flies, and the amount of Farm Plants needed to spawn it. | |
| Nightmare Werepig | Determines the respawn time of the Nightmare Werepig. | |
| Spider Queen | Determines the spawn chance of Spider Queen. | |
| Toadstools | Determines the respawn time of Toadstools. | |
| Treeguards | Determines the spawn chance of Treeguards. |
World Generation for Caves
World
| Type | Icon | Content |
|---|---|---|
| Biomes | The only available options is underground and can not be changed. | |
| Spawn Area | The only available options is caves and can not be changed. | |
| World Size | Determines the size of the world. This does not appear to increase the number of biomes. It just makes the individual biomes larger. Available options are small, medium, large (default), and huge. | |
| Branches | Determines the degree to which the land will branch off and be connected by bridging pieces. Available options are never, least, default, most and random. Never creates circle maps with large holes in the middle. Most creates maps with a center and multiple arms. See the picture below this table for examples of how this option changes the shape of the map in combination with Land Looping. | |
| Loops | Determines the degree to which Roads will tend to lead you in circles, in addition to determining the degree to which the land will curve. Available options are none, default and always. See the picture below this table for examples of how this option changes the shape of the map in combination with Land Branching. | |
| Touch Stones | Determines the amount of naturally spawning Touch Stones. Available options are none, little, less, default, more, lots, tons and insane. | |
| Failed Survivors | Determines the amount of naturally spawning Set Pieces. Available options are none, little, less, default, more, lots, tons and insane. | |
| Sinkhole Lights | Determines the amount of light that come from the ceiling of Caves. Available options are none, very slow, slow, default, fast and very fast. | |
| Starting Resource Variety | Determines how many basic resources () will be replaced by their alternate versions. Available options are classic, default and highly random, classic means no alternate versions and highly random means a lot alternate versions. |
Resources
Available options are none, little, less, default, more, lots, tons and insane.
| Type | Icon | Content |
|---|---|---|
| Berry Bushes | Determines the amount of naturally spawning Berry Bushes. | |
| Boulders | Determines the amount of naturally spawning Boulders. | |
| Cave Bananas | Determines the amount of naturally spawning Cave Banana Trees. | |
| Cave Ferns | Determines the amount of naturally spawning Ferns. | |
| Flint | Determines the amount of naturally spawning Flint found on the ground. | |
| Glow Berries | Determines the amount of naturally spawning Glow Berries. | |
| Grass | Determines the amount of naturally spawning Grass Tufts. | |
| Lichen | Determines the amount of naturally spawning Lichen. | |
| Light Flowers | Determines the amount of naturally spawning Light Flowers. | |
| Mushtrees | Determines the amount of naturally spawning Mushtrees. | |
| Mushrooms | Determines the amount of naturally spawning Mushrooms. | |
| Ponds | Determines the amount of naturally spawning Ponds. | |
| Reeds | Determines the amount of naturally spawning Reeds. | |
| Saplings | Determines the amount of naturally spawning Saplings. | |
| Spiky Bushes | Determines the amount of naturally spawning Spiky Bushes. | |
| Trees (All) | Determines the amount of naturally spawning Trees. |
Creatures and Spawners
Available options are none, little, less, default, more, lots, tons and insane.
| Type | Icon | Content |
|---|---|---|
| Rabbit Hutches | Determines the amount of naturally spawning Rabbit Hutches. | |
| Rock Lobsters | Determines the amount of naturally spawning Rock Lobsters. | |
| Slurpers | Determines the amount of naturally spawning Slurpers. | |
| Slurtle Mounds | Determines the amount of naturally spawning Slurtle Mounds. | |
| Splumonkey Pods | Determines the amount of naturally spawning Splumonkey Pods. |
Hostile Creatures and Spawners
Available options are none, little, less, default, more, lots, tons and insane.
| Type | Icon | Content |
|---|---|---|
| Bats | Determines the amount of naturally spawning Bat Caves. | |
| Cave Worms | Determines the amount of naturally spawning Depths Worms. | |
| Clockworks | Determines the number of extra spawning Clockwork Monsters. This does not affect the number of Damaged Clockwork Monsters in the Ruins. | |
| Nightmare Fissures | Determines the amount of naturally spawning Nightmare Fissures. | |
| Spider Dens | Determines the amount of naturally spawning Spider Dens. | |
| Spilagmites | Determines the amount of naturally spawning Spilagmites. | |
| Tentacles | Determines the amount of naturally spawning Tentacles. |
Removed
| Type | Icon | Content |
|---|---|---|
| Disease | Determines the frequency of Disease. Available options are none, random, slow, default and fast. |
Template:Trivia Trivia
- The options determining the amount of naturally spawning Sinkholes and Mandrakes have been removed.
- The option determining the frequency of Vargs has been replaced by the option for Hunt Surprises.
- There are currently 3 presets: "Lights Out", "Together Plus", and an option to disable Reign of Giants.
Template:Gallery Gallery
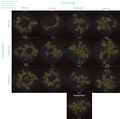
Chart depicting examples of maps with each possible combination of Land Loops and Land Branches.
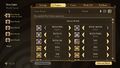
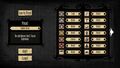
The customization interface at the default setting.
The old customization interface of Don't Starve Together.
Old Portal Activity Settings Icon in bata.


